Although it seems kind of counterintuitive, some of Microsoft’s best tools for managing Windows are not actually included in the Windows operating system. I’m not talking about add-on products like System Center, but rather free tools you can download from the Microsoft Web site. One such tool, Remote Desktop Connection Manager, has been making my life a lot easier lately, so I wanted to take the opportunity to talk about this tool for benefit of anyone who might not be familiar with it.
Remote Desktop Connection Manager is designed to solve a simple problem: RDP session overload. Like many admins, I have an overabundance of RDP files that I use to remotely connect to various Windows servers. Remote Desktop Connection Manager can clean up the clutter by acting as a central connection point for remote servers. It also does a good job of organizing RDP connections.
How to get Remote Desktop Connection Manager
As previously noted, Remote Desktop Connection Manager is not a part of the Windows operating system. It’s an add-on tool that you can download for free from Microsoft.
The download is tiny and should complete within a matter of a couple of seconds. Setting up the tool involves using a standard Setup wizard that basically just asks you to accept a license agreement and click Next a few times.
When you launch Remote Desktop Connection Manager for the first time, you will be presented with a very sparse interface, as shown below. The reason why so much of the interface is empty is because the empty space is reserved for RDP sessions.

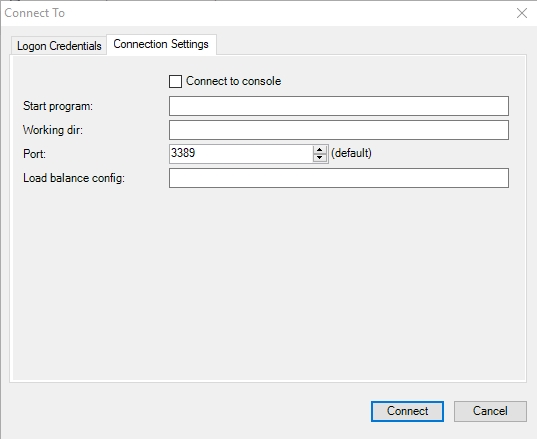
To establish your first RDP session, go to the Session menu and choose the Connect To option. Upon doing so, you will be presented with a dialog box like the one shown below that prompts you for the server name (although you can use an IP address instead), username, password, and domain.

Although this dialog box seems simple enough, there are a couple of things that are worth pointing out. First, you will notice that the dialog box contains a Connection Settings tab. This tab, which you can see in the figure below, gives you the option of launching an application, setting a working directory, specifying a custom RDP port, and providing a load balancing configuration.
Another thing that is worth pointing out is that you have the ability to create a custom profile, so that you do not have to enter the same authentication information over and over again for every connection.
Organize RDP connections with ease
Being that at least some of the settings that I have shown you so far are so similar to the native Windows RDP client, you may be wondering what it is that I like so much about the Remote Desktop Connection Manager. The short answer to why I like this utility so much is that it makes it easy for you to organize your RDP connections. If you look at the figure below, you can see that I have added connections to two remote machines and the Remote Desktop Connection Manager provides thumbnails for each.

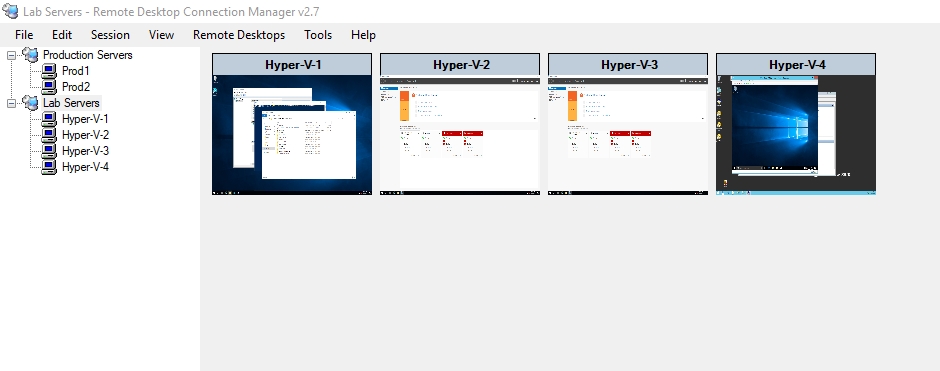
Of course, if you have enough servers to manage, then the interface shown in the figure above could quickly become cluttered. That’s where another favorite feature comes into play. Remote Desktop Connection Manager allows you to group your RDP connections. You might group sessions by server type, function, geographic location, or by some other organizational structure.
To create a group, go to the File menu and click on New. Upon doing so, you will be prompted to create an RDCMan Group (RDG) file. The filename that you enter should be the same as the name that you want to assign to your group. In the figure below for example, I am creating a file called Lab Servers.

As you add additional RDP sessions to Remote Desktop Connection Manager, you can drag those sessions to the appropriate group. You can see an example of this in the figure below. Notice in the figure that I have the Lab Servers group selected, and that the interface only displays thumbnails for the servers within the selected group.
So what if you want to use one of your RDP sessions? To do so, just click on the thumbnail that corresponds to the session that you want to look at and the console will instantly display the selected RDP session. Because you have already provided the required credentials at the time when you defined the session, you don’t have to worry about providing a password when you switch between sessions.
Unfortunately, there does not seem to be an option to select multiple thumbnails and view RDP sessions side by side within the console. However, the Session menu does include an Undock option that you can use to bring an RDP session out of the console and into its own window.
So what happens when you close the Remote Desktop Connection Manager? As you would probably expect, closing the console terminates your RDP sessions. The next time that you open the console, it looks something like this:

The easy way to reconnect to all of your managed servers is to select the Server checkbox (as opposed to the checkboxes for each individual server), and then click Connect. You can be back where you left off with only two mouse clicks.
A huge time saver
Remote Desktop Connection Manager has quickly become one of my favorite free Windows Server management tools because it is a huge time saver. The tool allows you to effortlessly move from one RDP session to the next.
The post Get a handle on remote management with Remote Desktop Connection Manager appeared first on TechGenix.